
{article.name}
JLC Field Guide: Shingles
A vented rain screen is the best way to make any cladding last. But, it's a lot easier to do with board siding than it is with wood or composite wall shingles.
Shingle and Shake Coverage
The same shingles and shakes used to cover roofs may be used as siding; however, different maximum exposures apply (see Figure: Shingle and Shake Maximum Exposures in Weather Exposure). Also, manufacturers package their shingles differently. The number of shingles in a bundle may vary, depending on the mill, so always check the label for the number of bundles required to make one square at the baseline exposure. Refer to Shingle Wall Coverage and Shake Wall Coverage figures, below, to calculate coverage.
Figure: Shingle Wall Coverage (sq. ft.) at Various Exposures
Assumes single-course application; some exposures require double course
Sum of the shingles stacked; e.g., 5/2” means 5 butts = 2” thick
| Weather Exposure (in.) | Length and Thickness (in.) | ||
|---|---|---|---|
| 16 x 5/2 | 18 x 5/2 1/4 | 24 x 4/2 | |
| 3 1/2 | 70 | — | — |
| 4 | 80 | 72 1/2 | — |
| 4 1/2 | 90 | 81 1/2 | — |
| 5 | 100 | 90 1/2 | — |
| 5 1/2 | 110 | 100 | 73 1/2 |
| 6 | 120 | 109 | 80 |
| 6 1/2 | 130 | 118 | 86 1/2 |
| 7 | 140 | 127 | 93 |
| 7 1/2 | 150 | 136 | 100 |
| 8 | 160 | 145 1/2 | 106 1/2 |
| 8 1/2 | 170 | 154 1/2 | 113 |
| 9 | 180 | 163 1/2 | 120 |
| 9 1/2 | 190 | 172 1/2 | 126 1/2 |
| 10 | 200 | 181 1/2 | 133 |
| 10 1/2 | 210 | 191 | 140 |
| 11 | 220 | 200 | 146 1/2 |
| 11 1/2 | 230 | 209 | 153 |
| 12 | 240 | 218 | 160 |
| 12 1/2 | — | 227 | 166 1/2 |
| 13 | — | 236 | 173 |
| 13 1/2 | — | 245 1/2 | 180 |
| 14 | — | 254 1/2 | 186 (1/2) |
| 14 1/2 | — | — | 193 |
| 15 | — | — | 200 |
| 15 1/2 | — | — | 206 1/2 |
| 16 | — | — | 213 |
To calculate quantity of shingles needed:
- Calculate total area to be sided;
- subtract area of openings greater than 50 sq. ft.;
- add 5% of adjusted total area for waste;
- select nearest approximate coverage for the shingle size to be used;
- divide by 100 to find number of squares of material needed for the job. For double-course applications, divide by 50 to calculate actual squares needed.
In addition to field coverage found in tables:
- Add one square for every 100 vertical ft. of corners. (For smaller jobs, figure one bundle for every 25 ft. of corners if material comes in a four-bundle square, or one bundle for every 20 ft. of corners if material comes in a five-bundle square.)
- Do not subtract area of openings unless their area is greater than 50 sq. ft.
- Add an additional 5% for waste.
- For starter courses, add one square for every 120 lin. ft. of wall skirt for single-course applications, or one square for every 60 lin. ft. of wall skirt for double-course applications.
Figure: Shake Wall Coverage (sq. ft.) at Various Exposures
Assumes single-course application; some exposures require double course
| Shake Type, Length, and Thickness (in.) | Weather Exposures (in.) | ||||||
|---|---|---|---|---|---|---|---|
| 7 | 8 1/2 | 10 | 11 1/2 | 14 | 16 | 18 | |
| 18 x 1/2 Handsplit and Resawn Mediums | 70 | 85 | 100 | 115 | 140 | — | — |
| 18 x 3/4 Handsplit and Resawn Heavies | 70 | 85 | 100 | 115 | 140 | — | — |
| No. 1 18 Taper-Sawn | 70 | 85 | 100 | 115 | 140 | 160 | 180 |
| 24 x 1/2 Handsplit and Resawn Mediums | 70 | 85 | 100 | 115 | 140 | 160 | 180 |
| 24 x 3/4 Handsplit and Resawn Heavies | 70 | 85 | 100 | 115 | 140 | 160 | 180 |
| No. 1 24 Taper-Sawn | 70 | 85 | 100 | 115 | 140 | 160 | 180 |
| 24 x 1/2 Taper-Split | 70 | 85 | 100 | 115 | 140 | 160 | 180 |
| 18 x 3/8 True-Edge Straight-Split | 50 | 60 | 71 | 82 | 100 | — | — |
| 18 x 3/8 Straight-Split | 82 | 100 | 118 | 135 | 165 | — | — |
| 24 x 3/8 Straight-Split | 70 | 85 | 100 | 115 | 140 | 160 | 180 |
To calculate quantity of shakes needed:
- Calculate total area to be sided;
- subtract area of openings greater than 50 sq. ft.;
- add 5% of adjusted total area for waste;
- select nearest approximate coverage for the shake size to be used;
- divide by 100 to find number of squares of material needed for the job. For double-course applications, divide by 50 to calculate actual squares needed.
STARTER COURSE
The underlying course can be either the No. 1 grade product used on the outer course or a lower-grade product.
STARTER COURSE FOR SHINGLES AND SHAKES
Starter strip is not recommended for shingle and shake siding. Use a starter course of shingles instead (see Starter Course in Double-Coursing). A lower-quality shingle grade, such as No. 3 Black Label or No. 4 undercoursing, is a suitable starter course for sidewall shingles and shakes. Note: This means that double-course shingle and shake applications start with three courses.
Shingle and Shake Grades
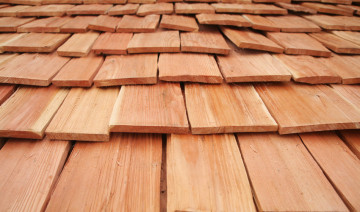
Wood shingles and shakes are made from redwood, western red cedar, northern white cedar, and cypress. Most shingles are sawn smooth on both faces. Shakes are thicker and have at least one split surface, which leaves a rough texture.
Shingle and shake grades for sidewalls are largely the same as those used for roofs. The exception is machine-grooved shakes (also called “rebutted/regrooved shingles”). These are sawn into 16-, 18-, and 24-in. lengths (butts measuring .4 in., .45 in., and .5 in., respectively) with parallel edges, and the face is grooved with striations. Machine-grooved shakes should be double-coursed (see Double-Coursing).
Drainage Planes for Shingles and Shakes
The most practical way to create a drainage plane for shingle and shake siding is with a self-draining rainscreen mat (below).
Figure: Drainage Plane for Shingle Siding

To create a drainage plane for wood shakes and shingles, install the siding over a drainage mat that will provide a channel to allow water down and out.
If the wall is furred out, horizontal battens will block drainage unless they are installed over opposing vertical battens (spaced 16- to 24-in. o.c.), creating a grid of strapping. Space horizontal battens the length of the shingle, and space vertical battens 16- to 24-in. o.c. With double thickness 1x battens, pack out windows, doors, and corners with 2x material.
Prior to installing strapping or a rainscreen mat, wrap and flash wall sheathing.
Corner Treatments
Corner boards are commonly used with white cedar shingles, but in traditional style, shingles or shakes are joined to each other at the corners.
Outside corners. With shakes and red-cedar shingles, corners are often woven with two courses on one side alternating with two courses on the other, each hand-planed to the corner profile. This is labor-intensive and requires small, galvanized finish nails to hold the butt joints closed (Inside and Outside Corners, below).
Mitering shakes and shingles is not recommended. These corners are likely to open when the siding shrinks, even if nailed.
Inside corners. Flash inside corners with a right-angle flashing extended at least 3 in. under the shingle courses. At a minimum, they should receive an extra layer of building paper.
The simplest inside corner trim is a 1x1 or 2x2 wood strip installed in the corner with the shingles butted against it (Inside and Outside Corners, below). Inside corners also may be woven in a manner similar to outside corners — two courses on one side, followed by two courses on the other.
Figure: Inside and Outside Corners
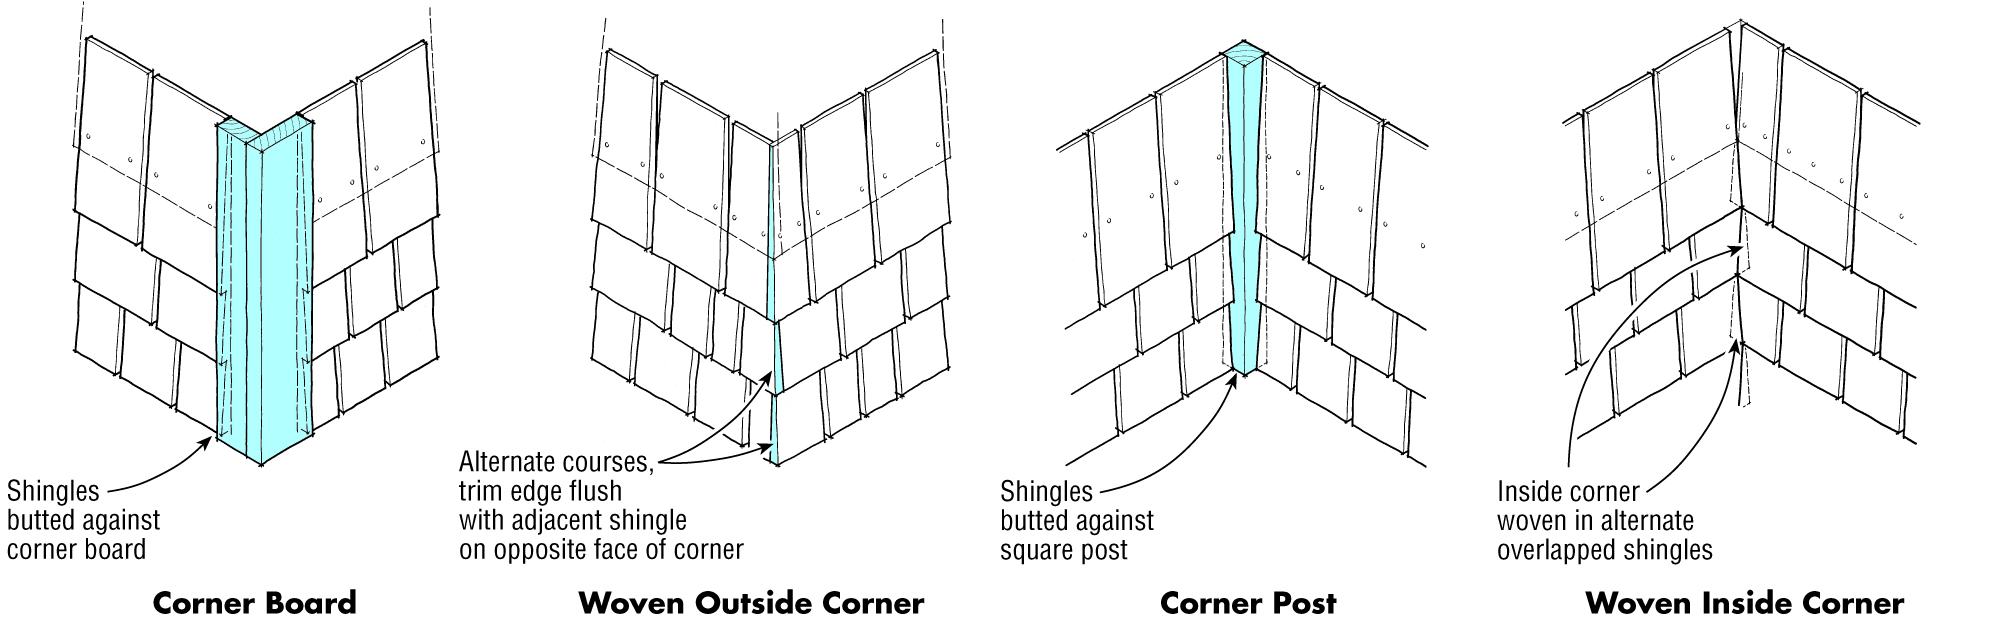
A woven corner, typically accomplished with a block plane, is made by alternately lapping a shingle piece on each course. Inside corners may also be woven, but the easiest and cleanest treatment is to butt shingles against a 1- to 2-in.-square post.
Weather Exposure
Shingles and shakes may be applied in single or double courses. Double-coursing allows for a greater weather exposure (Shingle and Shake Maximum Exposures, below).
Figure: Shingle and Shake Maximum Exposures
| Shingle Length | Single Course | Double Course (No. 1) | Double Course (No. 2) |
|---|---|---|---|
| 16" | 7 1/2" | 12" | 10" |
| 18" | 8 1/2" | 14" | 11" |
| 24" | 11 1/2" | 16" | not recommended |
| Shake Length & Type | Single Course | Double Course (No. 1) |
|---|---|---|
| 16" machine-grooved | 7 1/2" | 12" |
| 18" machine-grooved | 8 1/2" | 14" |
| 18" resawn | 8 1/2" | 14" |
| 24" resawn | 11 1/2" | 18" |
| 18" taper-sawn | 8 1/2" | 14" |
| 24" taper-sawn | 11 1/2" | 18" |
| 24" tapersplit | 11 1/2" | 18" |
| 18" straight-split | 8 1/2" | 16" |
The maximum weather exposures for shingles and shakes varies, depending on the length and type of material, as well as on the application (single- or double-course).
Double-Coursing
Double-coursing uses two layers of shingles (or one layer of shakes over a layer of No. 3 or No. 4 shingle). This application allows for wider weather exposures, and creates deep shadow lines at the butt ends (Double-Coursing, below).
STARTER COURSE
Begin with a double underlay course or a single underlay course shimmed out the thickness of a shingle butt with wood lath. Nail undercourse shingles with a single nail in the center.
Figure: Double-Coursing

This approach to laying shakes and shingles features wide weather exposures and deep shadow lines. The outer course drops about 1/2 in. below the undercourse, which typically consists of low-grade shingles.
FACE NAIL
Double-course applications require face-nailing. Face-nail outer shingles with two nails placed about 2 in. above the butt line and 3/4 inch in from each end. Shingles wider than 8 in. get two more nails driven near the center, about 1 in. apart. The outer course drops about 1/2 in. below the undercourse.
DOUBLE-COURSE VARIATIONS
Double-course shingles or shakes may also be used over non-wood sheathing (fiberboard or gypsum). In this case, nail strapping below the butt end of the undercourse with 8d box nails, spaced on-center the distance of the weather exposure.
For visual effect, raising the overcourse about 1 in. provides a double shadow line (Decorative Coursing Variations, below). In this case, the undercourse should be a No. 1 grade shingle.
Figure: Decorative Coursing Variations

Over solid sheathing, a double shadow line can be achieved by raising the outer course about 1 in. (near left). Single-course applications can be staggered to create an irregular appearance (far left).
Single-Coursing
Single-coursing is quicker and less expensive because less material is used for a given wall area. However, it requires a narrow weather exposure (Single-Coursing, below).
Figure: Single-Coursing

Each course is blind-nailed about 1 in. above the butt line, using two nails for shingles up to 8 in. wide and four nails for larger ones. Offset joints in successive courses by at least 1 1/2.
STARTER COURSE
Double the first course using inexpensive, lower-grade shingles (No. 3 Black Label or No. 4 Undercoursing).
BLIND NAIL
Drive nails about 1 in. above the butt line of the course above. For shingles up to 8 in. wide, use two nails per shingle about 3/4 in. from each edge. For wider shingles, drive two more nails about 1 in. apart near the center (Preventing Splits in Wide Shingles, below).
STAGGERED COURSING
For visual effect, butts can be staggered below (not above) the horizontal line (Decorative Coursing Variations, above). The maximum distance to stagger the butts varies with shingle or shake length: Stagger 1 in. for 16's and 18's or 1 1/2 in. for 24's.
Figure: Preventing Splits in Wide Shingles

Wide side-wall shingles (over 8 in.) are prone to splitting. To avoid problems, blind-nail as shown above.
Fastening Checklist
Nails
- Install sidewall shingles or shakes with rust-resistant box nails or special shingle nails long enough to penetrate the sheathing (or nailing strips) at least 1/2- to 3/4-in. Nails should be hot-dipped galvanized, Type 304 or 316 stainless steel, or high-tensile aluminum. (Type 316 is required within 15 miles of salt water.)
- Drive nails flush to the shingle or shake surface, but not hard enough to crush the wood fibers, which could split the wood.
- For single-coursing, 3d or 4d shingle nails are commonly used. For double-coursing, 3d or 4d nails are typically used on the undercourse, and 5d box or shingle nails are used on the outer exposed course.
Staples
- Stainess-steel (304 or 316) staples can be used and are preferred by many installers to help prevent splitting. Use only 316 stainless-steel within 15 miles of salt water or when using fire-retardant-treated materials.
- To meet CSSB requirements referenced in the code, use min. 16-guage staples with a min. 7/16-in. to max. 3/4-in. crown.
(For more information refer to the Cedar Shake and Shingle Bureau Wall Manual).
Shingle and Shake Layout
SHINGLE GAP
Space all exposed shakes or shingles about 1/8 in. from each other. This allows room for expansion and gives pieces an individual appearance. Tightly packed shingles that get wet before finishing can buckle.
Offset joints in successive courses by at least 1 1/2 in. to avoid leakage between shingles.
ALIGNING COURSES
To determine the number of courses, divide the height of the wall into equal parts whose length is not greater than the weather exposure for the shake or shingle. Wherever possible, align shingle butt lines with the tops or bottoms of windows or other openings. This may require adjusting a few courses by a fraction of an inch (Even Shingle Layout, below).
Figure: Even Shingle Layout

To find the number of shingle courses between the top and the bottom of a window: 1) Measure the window height plus the trim. Divide this number by the average shingle exposure. If the resulting number is a fraction, choose the nearest whole number. 2) Hold a tape measure at the corner where the head trim will be, and pull it out to an even multiple. To find the course lines, mark off the even multiples.
Comments